1. 前言
Hugo 是一个用 Go 语言编写的静态网站生成器, 它可以将 Markdown 文件转换为 HTML 文件,支持主题和插件, 生成的网站可以直接部署到 GitHub Pages 、云服务器等。
本文将介绍如何使用 Hugo 搭建个人博客并使用 GitHub Actions 自动部署到 GitHub Pages 上。
实现的效果是,当我们将博客的 Markdown 文件推送到 GitHub 仓库时,
GitHub Actions 会自动构建 Hugo 网站,并将生成的 HTML 文件推送到 GitHub Pages 上,
这样我们就可以通过https://<username>.github.io访问我们的博客。
后面会大致介绍下如何将 Hugo 部署到云服务器上,没有特殊需求不建议折腾。
2. 安装 Hugo
具体安装方法可以参考 Hugo 官方文档 。
以我使用的 Arch Linux 为例,可以通过以下命令安装 Hugo :
sudo pacman -S hugo
3. 创建 Hugo 网站
初学者可以参考 Hugo 官方教程 。 由于我使用的是 PaperMod 主题, 如果你也想使用这个主题, 可以参考 PaperMod 安装教程 。
以下我列出使用 git submodule 方法(推荐)创建 PaperMod 主题的 Hugo 网站的命令:
hugo new site blog --format yaml  # 可以替换 blog 为其他目录名
cd blog
git submodule add --depth=1 https://github.com/adityatelange/hugo-PaperMod.git themes/PaperMod
echo "theme: [\"PaperMod\"]" >> hugo.yaml
如果你未来想要更新 PaperMod 主题,可以使用以下命令:
git submodule update --remote --merge
4. 编写博客
- 新建文章
hugo new content content/posts/hello-world/index.md
content/posts/hello-world/index.md就是新建的文章的路径,
你可以在这个文件中使用 Markdown 语法编辑你的博客内容。
其中draft字段决定了文章是否为草稿,
如果你想要发布这篇文章,可以将draft字段设置为false。
- 预览 Hugo 网站
当你完成了博客的编辑,可以使用以下命令在本地运行 Hugo 网站:
hugo server -D # -D 参数表示需要显示草稿
你可以在浏览器中访问http://localhost:1313(终端中输出的地址)从而在本地浏览你的博客。
网站具有实时预览效果,每当你修改了博客内容后,浏览器会自动刷新。
- 配置 Hugo 网站(可选)
具体网站的配置可以参考 Hugo 官方文档 以及 PaperMod 文档 。 也可以参考我个人博客网站的 配置 。
5. 使用 Github 管理博客
使用版本控制工具可以方便我们管理博客的历史版本,同时也算是一种备份。
- 创建 GitHub 仓库
具体如何创建可以搜网上的教程,这里不再赘述。 创建并提交后的仓库类似于 github.com/m1dsolo/blog 。
6. 部署到 GitHub Pages
到目前为止,我们已经完成了本地 Hugo 网站的搭建和博客的编写, 接下来我们将介绍如何使用 GitHub Actions 自动部署到 GitHub Pages 上。
- GitHub Actions 配置
首先对于我们刚刚创建好的 GitHub 仓库,我们需要配置 GitHub Actions , 这样每当我们将博客的 Markdown 文件推送到 GitHub 仓库时, GitHub Actions 会自动构建 Hugo 网站,并将生成的 HTML 文件推送到 GitHub Pages 上。
在博客仓库的根目录下创建.github/workflows目录,
然后在该目录下创建deploy.yml文件,填入:
name: Deploy with Hugo

on:
  push:
    branches:
      - main

jobs:
  build-deploy:
    runs-on: ubuntu-latest

    steps:
    - uses: actions/checkout@v4
      with:
        fetch-depth: 0

    - name: Setup Hugo
      uses: peaceiris/actions-hugo@v3
      with:
        hugo-version: 'latest'
        extended: true

    - name: Build
      run: hugo --minify

    - name: Deploy Github
      uses: peaceiris/actions-gh-pages@v4
      if: github.ref == 'refs/heads/main'
      with:
        personal_token: ${{ secrets.PERSONAL_TOKEN }}
        external_repository: m1dsolo/m1dsolo.github.io
        publish_branch: main
        publish_dir: ./public
- 创建 Personal Token
因为 GitHub Actions 需要推送生成的 HTML 文件到 GitHub Pages 上, 也就是需要访问另外一个仓库,通过配置 Personal Token 可以赋予当前仓库操控另外一个仓库的权限。 可以参考 peaceiris/actions-gh-pages 。
如果之前没有创建过 Personal Token ,可以在 github tokens 页面创建一个 token ,
- 配置 Secrets
在 GitHub 博客仓库的 Settings -> Secrets 页面中,添加一个名为PERSONAL_TOKEN的 secret ,
值为你刚刚创建的 Personal Token 。(PERSONAL_TOKEN这个变量名与deploy.yml中变量名保持一致)。
- 创建 GitHub Pages 仓库
创建 GitHub 仓库<username>.github.io,其中<username>为你的 GitHub 用户名。
这个仓库将用于存放 Hugo 的生成的 html 文件,
github 会自动将这些文件部署到https://<username>.github.io。
以我的 GitHub 为例,我的仓库为 m1dsolo.github.io 。
7. 配置图床(可选)
博客中的图片可以使用图床来存储,这样可以减少 Git 仓库的大小。 可以选择一些免费图床,但是有些图床可能会有流量限制,同时可能会有访问速度的问题。 我这里选择使用自己的云服务器作为图床。
大致步骤:
upload_image脚本传输图片到云服务器nginx配置图片访问路径neovim插件来自动上传图片
具体就不细说了,以后有机会再展开。
8. 配置搜索(可选)
参考 PaperMod 搜索文档 。
9. 配置 favicon (可选)
favicon 是网站的图标,比如:

你可以使用 favicon.io 来生成 favicon 。
只需要将生成的favicon.ico放到static目录下,然后修改hugo.yaml:`
params:
  assets:
    favicon: "favicon.ico"
    favicon16x16: "favicon.ico"
    favicon32x32: "favicon.ico"
    apple_touch_icon: "favicon.ico"
    safari_pinned_tab: "favicon.ico"
9. 配置评论(可选)
这里我选用 giscus 来配置评论功能。 因为它开源同时支持 GitHub 登录,不需要注册额外的账号。
配置 giscus 链接为 giscus.app 。 具体配置步骤如下:
在你的仓库
<username>.github.io中启用 Discussion (Settings->Features->Discussions), 同时确保你的仓库是公开的。安装 giscus app ,赋予仓库
<username>.github.io权限。根据 giscus 的
script修改hugo.yaml:
giscus 的 script 如下:

修改为对应的yaml格式写入hugo.yaml中:
params:
  giscus:
    repo: "m1dsolo/m1dsolo.github.io"
    repoId: "R_kgDONmlNVQ"
    category: "Announcements"
    categoryId: "DIC_kwDONmlNVc4Cm94p"
    mapping: "pathname"
    strict: 0
    reactionsEnabled: 1
    emitMetadata: 0
    inputPosition: "bottom"
    theme: "preferred_color_scheme"
    lang: "zh-CN"
    crossorigin: "anonymous"
在layouts/partials下新建comments.html文件并填入:
<div id="tw-comment"></div>
<script>
    // 默认是暗色,根目录下的配置中的主题默认也是暗色
    const getStoredTheme = () => localStorage.getItem("pref-theme") === "light" ? "{{ .Site.Params.giscus.lightTheme }}" : "{{ .Site.Params.giscus.darkTheme }}";
    const setGiscusTheme = () => {
        const sendMessage = (message) => {
            const iframe = document.querySelector('iframe.giscus-frame');
            if (iframe) {
                iframe.contentWindow.postMessage({giscus: message}, 'https://giscus.app');
            }
        }
        sendMessage({setConfig: {theme: getStoredTheme()}})
    }

    document.addEventListener("DOMContentLoaded", () => {
        const giscusAttributes = {
            "src": "https://giscus.app/client.js",
            "data-repo": "{{ .Site.Params.giscus.repo }}",
            "data-repo-id": "{{ .Site.Params.giscus.repoId }}",
            "data-category": "{{ .Site.Params.giscus.category }}",
            "data-category-id": "{{ .Site.Params.giscus.categoryId }}",
            "data-mapping": "{{ .Site.Params.giscus.mapping }}",
            "data-strict": "{{ .Site.Params.giscus.strict }}",
            "data-reactions-enabled": "{{ .Site.Params.giscus.reactionsEnabled }}",
            "data-emit-metadata": "{{ .Site.Params.giscus.emitMetadata }}",
            "data-input-position": "{{ .Site.Params.giscus.inputPosition }}",
            "data-theme": getStoredTheme(),
            "data-lang": "{{ .Site.Params.giscus.lang }}",
            "data-loading": "lazy",
            "crossorigin": "anonymous",
        };

        // 动态创建 giscus script
        const giscusScript = document.createElement("script");
        Object.entries(giscusAttributes).forEach(
                ([key, value]) => giscusScript.setAttribute(key, value));
        document.querySelector("#tw-comment").appendChild(giscusScript);

        // 页面主题变更后,变更 giscus 主题
        const themeSwitcher = document.querySelector("#theme-toggle");
        if (themeSwitcher) {
            themeSwitcher.addEventListener("click", setGiscusTheme);
        }
        const themeFloatSwitcher = document.querySelector("#theme-toggle-float");
        if (themeFloatSwitcher) {
            themeFloatSwitcher.addEventListener("click", setGiscusTheme);
        }
    });
</script>
10. 配置数学公式(可选)
这里使用mathjax来配置数学公式。
参考 官方文档 。
- 在
layouts/partials下新建mathjax.html文件并填入:
<script id="MathJax-script" async src="https://cdn.jsdelivr.net/npm/mathjax@3/es5/tex-chtml.js"></script>
<script>
  MathJax = {
    tex: {
      displayMath: [['\\[', '\\]'], ['$$', '$$']],  // block
      inlineMath: [['\\(', '\\)']]                  // inline
    },
    loader:{
      load: ['ui/safe']
    },
  };
</script>
- 在
layouts/partials下新建extend_head.html文件并填入:
{{ if or .Params.math .Site.Params.math }}
    {{ partialCached "math.html" . }}
{{ end }}
- 在
hugo.yaml`中添加以下配置:
markup:
  goldmark:
    extensions:
      passthrough:
        delimiters:
          block:
          - - \[
            - \]
          - - $$
            - $$
          inline:
          - - \(
            - \)
        enable: true
params:
  math: true
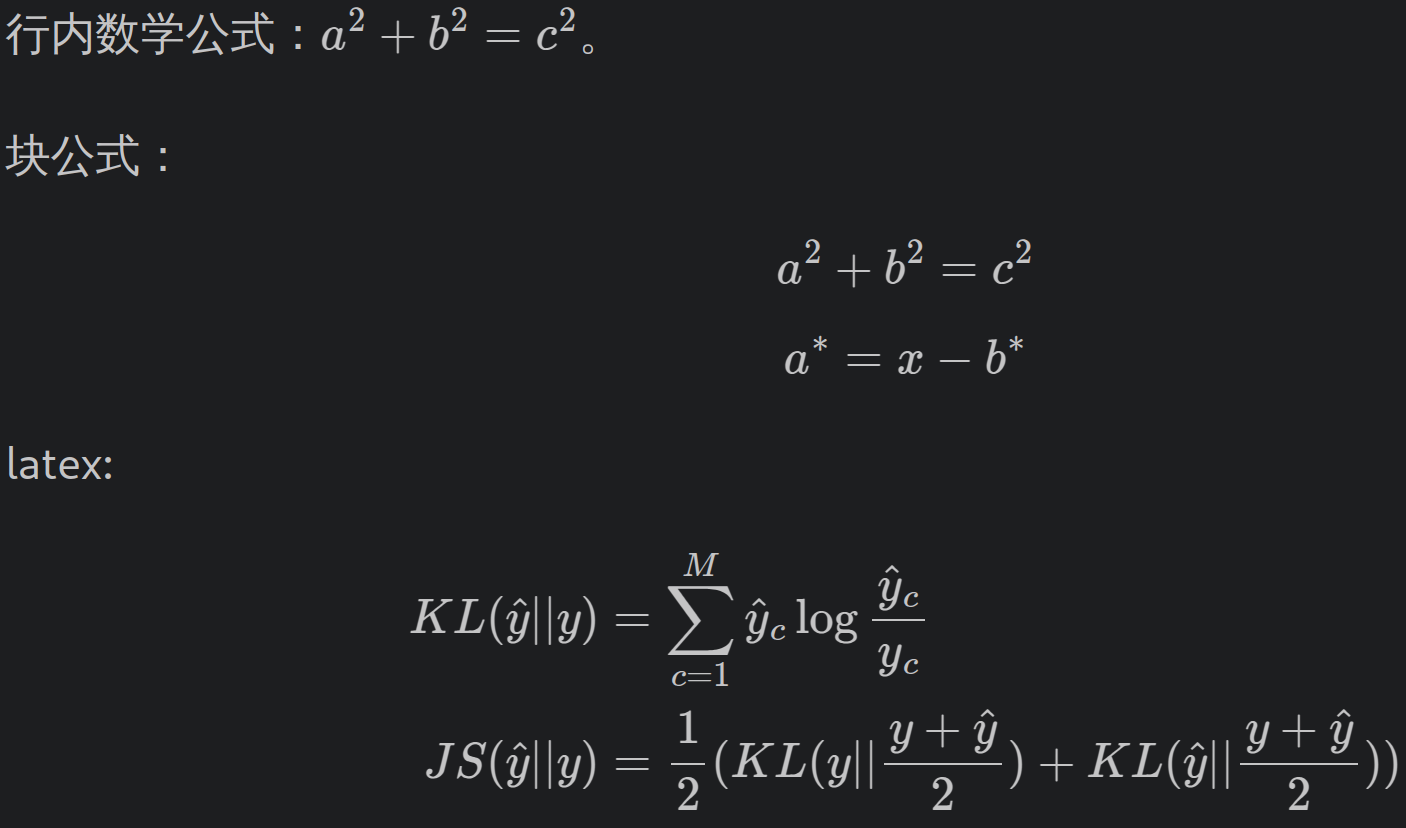
测试用数学公式:
行内数学公式:\(a^2 + b^2 = c^2\)。

块公式:

$$
a^2 + b^2 = c^2
$$

\[
a^*=x-b^*
\]

latex:

\[
\begin{aligned}
KL(\hat{y} || y) &= \sum_{c=1}^{M}\hat{y}_c \log{\frac{\hat{y}_c}{y_c}} \\
JS(\hat{y} || y) &= \frac{1}{2}(KL(y||\frac{y+\hat{y}}{2}) + KL(\hat{y}||\frac{y+\hat{y}}{2}))
\end{aligned}
\]
行内数学公式:\(a^2 + b^2 = c^2\)。
块公式:
$$ a^2 + b^2 = c^2 $$\[ a^*=x-b^* \]latex:
\[ \begin{aligned} KL(\hat{y} || y) &= \sum_{c=1}^{M}\hat{y}_c \log{\frac{\hat{y}_c}{y_c}} \\ JS(\hat{y} || y) &= \frac{1}{2}(KL(y||\frac{y+\hat{y}}{2}) + KL(\hat{y}||\frac{y+\hat{y}}{2})) \end{aligned} \]mathjax渲染的数学公式结果如下(图片):
我遇到的问题主要是在某些网络环境下mathjax无法读取:
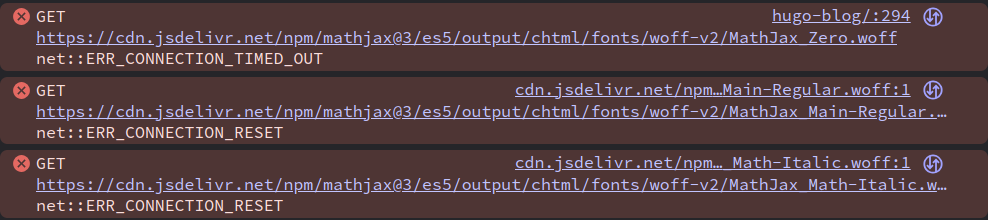
以后有需要再研究如何解决。
11. Google Analytics (可选)
Google Analytics 可以帮助我们分析网站的访问情况,可以参考 官方文档 。
首先在 google analytics 中注册一个账号,然后获取
tracking_id。将
tracking_id添加到hugo.yaml中:
services:
  googleAnalytics:
    id: "G-XXXXXXXXXX"  # replace with your tracking_id
- 在
layouts/partials/extend_head.html中添加:
{{ template "_internal/google_analytics.html" . }}
12. 访问量统计(可选)
我希望可以统计各个博客以及整个网站的访问量, 这里使用 busuanzi 来进行统计。 具体安装使用教程见 github 。
13. Markdown 通知块(可选)
Hugo 默认不支持 Markdown 的通知块, 我们可以使用 hugo-notice 来实现这一功能。
安装 hugo-notice :git submodule add --depth=1 https://github.com/martignoni/hugo-notice.git themes/hugo-notice。
然后在hugo.yaml中修改theme为:
theme: [hugo-notice, <your theme name>]
使用方法见: hugo-notice 。
效果:
注释
我是注释!
警告
我是警告!
提示
我是提示!
信息
我是信息!
14. 部署至云服务器(进阶)
由于国内访问 GitHub Pages 速度可能较慢,可以选择将个人博客网站部署到国内云服务器上。 我选择同时在云服务器上也部署博客网站主要是因为有一台云服务器闲置,不折腾下感觉浪费了。
部署到云服务器上大致以下步骤:
- 购买云服务器
- 购买域名
- 配置域名解析
- 配置 Nginx
- 域名备案
- 将备案信息添加到 footer
- secrets 配置云服务器的私钥
- 修改
deploy.yml
大部分内容可以网上搜到,我具体展开介绍下将备案信息添加到 footer和修改 deploy.yml。
将备案信息添加到 footer
在layouts/partials/extend_footer.html内新增:
<div style="display: flex; align-items: center; justify-content: center;">
    <img src="/image/beian-logo.png" width="12" style="margin-right: 5px;"/>
    <a href="https://beian.miit.gov.cn" rel="noreferrer" target="_blank" style="font-size: 12px;">京 ICP 备 2025109231 号-1</a>
</div>
具体备案信息修改为自己的即可。
修改deploy.yml
注意需要在hugo --minify时使用-b 参数来指代不同的baseURL,
因为 GitHub Pages 的域名是https://<username>.github.io,
与个人网站的域名不同。
name: Deploy with Hugo

on:
  push:
    branches:
      - main

jobs:
  build-deploy:
    runs-on: ubuntu-latest

    steps:
    - uses: actions/checkout@v4
      with:
        submodules: true
        fetch-depth: 1

    - name: Setup Hugo
      uses: peaceiris/actions-hugo@v3
      with:
        hugo-version: 'latest'
        extended: true

    - name: Build for Github
      run: hugo --minify -b https://m1dsolo.github.io/

    - name: Deploy Github
      uses: peaceiris/actions-gh-pages@v4
      if: github.ref == 'refs/heads/main'
      with:
        personal_token: ${{ secrets.PERSONAL_TOKEN }}
        external_repository: m1dsolo/m1dsolo.github.io
        publish_branch: main
        publish_dir: ./public

    - name: Build for Server
      run: hugo --minify -b http://m1dsolo.xyz/

    - name: Deploy Server
      uses: wlixcc/SFTP-Deploy-Action@v1.2.5
      if: github.ref == 'refs/heads/main'
      with:
        username: root
        server: ${{ secrets.SERVER_IP }}
        ssh_private_key: ${{ secrets.SSH_PRIVATE_KEY }}
        local_path: ./public/*
        remote_path: /var/www/blog
        sftpArgs: '-o ConnectTimeout=5'
注意将上面的-b参数改为你自己的域名。
15. 结语
通过本文的步骤,我们成功地使用 Hugo 搭建了个人博客网站,并通过 GitHub Actions 实现了自动部署到 GitHub Pages 的功能。
现在,每次你完成博客的撰写,只需将仓库推送到 GitHub ,
更新的内容就会自动部署到你的个人博客网站 https://<username>.github.io 上。
(别忘了将博客内的 draft 字段改为 false)